Introducing the LEI Management Platform
Legal Entity Identifiers (LEI’s) are 20-digit alphanumeric codes issued to Legal Entities. The code itself is also accompanied by several other machine-readable files which are uploaded to the GLEIF (Global LEI Foundation) web site and made available via an Open Data charter for anyone to download. CDF (Common Data Format machine readable files in XML (eXtensible Markup Language) are used to convey two levels of information. Namely Level 1 – Who is Who & Level 2 – Who owns Whom.
The technical details of the files and file structures are given on the GLEIF web site for enhanced / further reading. https://www.gleif.org/en/about-lei/common-data-file-format
During the application process we’ll be asking you to confirm that Level 1 identity data we’ve gathered for your Legal Entity is accurate (or asking you to provide data to us if we can’t locate some/all of it). We’ll then modify the structure, helping you choose the right Entity Legal Form, ISO 3166 codes to create the necessary CDF compliant files. Together, we’ll maintain the accuracy of the data over the lifetime of the LEI and at each successive annual renewal event – Multiyear options are available to help you simplify the purchase process and benefit from cost savings.
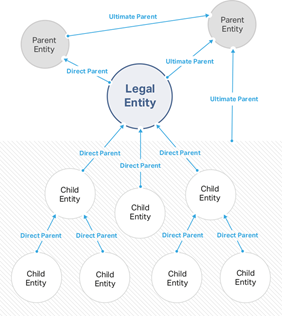
We focus most of the initial data gathering activates on the Legal Entity, and once we’ve confirmed this is correct, we’ll agree Terms of Service[1] and then look for Level 2 data on and Direct and/or Ultimate Parent(s) – if they exist according to the GLEIS (Global LEI System) definition of parents which uses accounting consolidation[2] as a globally accepted method.
This is basically how RapidLEI works…
1) START TYPING ORG NAME
2) E-SIGN IN YOUR BROWSER
3) YOUR LEI IS PUBLISHED
The first stage of the process identifies the Legal Entity and allows you to confirm LE-RD (Legal Entity Reference Data). – In many cases we can obtain this in real time via a few characters.
The next stage, with the LE-RD confirmed, is to eSign a contract for the supply and ongoing maintenance of the LEI.
The final stage of the process allows you to submit (or decline to submit) data on the corporate structure – in line with the GLEIF diagram. This allows us to create the necessary LE-RR (Legal Entity Relationship Records) or if there’s no parents, ER (Exception Records).
Once we have all necessary information from you, our vetting teams will verify accuracy and completeness and create the necessary records. These will be uploaded to the GLEIF. They’ll be published into the Concatenated Files[3] within 24 hours (or the Golden Copy[4] used as the basis for GLEIF Search 2.0) within 8 hours. We’ll let you know the LEI Number immediately, as it is valid for all your reporting and compliance purposes as soon as we issue it.
Over the lifetime of the LEI we have a joint responsibility to amend the LE-RD and LE-RR / LE-RE following any corporate actions which change the official Legal Entity details or the ownership structure. Here’s a simple table of what files we’ll create for you for each of the ownership cases.
| Direct Parent | Ultimate Parent | Reference Data (LE-RD) | Relationship Record (LE-RR) |
Parent Reference Data (PRD)* |
Exception Record (LE-ER) |
| Does not Exist | Does not Exist | Yes CDF | – | – | |
| Does not Exist | Exists (LEI) | Yes CDF | Yes |
– | |
| Does not Exist | Exists (no LEI) | Yes CDF | – | Yes |
|
| Exists (LEI) | Does not Exist | Yes CDF | Yes |
– | |
| Exists (LEI) | Exists (LEI) | Yes CDF | Yes |
– | |
| Exists (LEI) | Exists (no LEI) | Yes CDF | Yes |
Yes |
|
| Exists (no LEI) | Does not Exist | Yes CDF | – | Yes |
|
| Exists (no LEI) | Exists (LEI) | Yes CDF | Yes |
Yes |
|
| Exists (no LEI) | Exists (no LEI) | Yes CDF | – | Yes |
|
| International Branch Office | Yes CDF | Yes (Branch) | n/a (Head offices MUST have LEI’s) | n/a (Head offices MUST have LEI’s) | |
| Fund | Fund is a special Entity Category, however reporting of Level 2 information is still applicable if the fund consolidates to other entities. | ||||
| Sole Proprietor | Sole Proprietor is also a special Entity Category, however reporting of Level 2 information is still applicable even though in most cases this will be LE-ER only | ||||
*PRD is uploaded to the GLEIF as an internal relationship record for planning and LEI improvement processing – this is not publicly available via the GLEIF systems.
[1] RapidLEI Terms of Service can be found here https://rapidlei.com/documents/global-lei-system-terms/
[2] Details on the Legal Entity Identifier Regulatory Oversight Committee (LEI ROC) policy governing level 2 data needs can be found here https://www.gleif.org/en/lei-data/access-and-use-lei-data/level-2-data-who-owns-whom/lei-roc-policy-on-level-2-data
[3] GLEIF Concatenated files can be found here https://www.gleif.org/en/lei-data/gleif-concatenated-file/download-the-concatenated-file
[4] GLEIF Golden Copy files can be found here https://www.gleif.org/en/lei-data/gleif-golden-copy/download-the-golden-copy#/
Creating a User Account
You’ll need an account to be able to order LEIs. From the DASHBOARD, you can invest in NEW LEIs, RENEW existing LEIs or IMPORT (Transfer) LEIs from an alternative Managing LOU (LEI Issuer). The primary purpose of the DASHBOARD is to ensure no LEIs LAPSE. You can look 60, 45, 30 or 15 days ahead to see what’s due for renewal and of course the RapidLEI system will also remind you by email!
We’ll run through the details of each section in more detail on page 8 onwards, so if you already have an account, you can Login: https://lei.rapidlei.com/Account/Login.

If not, then sign up for an account here:- https://lei.rapidlei.com/Account/SignUp
Forgotten your password? – Don’t worry, click this link and we’ll send you an email with a link to restore it. (We don’t keep passwords in plain text, so we can’t send your password to you. You’ll need to create a new one from the link after answering the security question.)
Let us know your First Names(s), Last name and email. The email address chosen here will have a dual purpose – it allows you to use this identity to log in, but it also receives communications – renewal reminders etc.
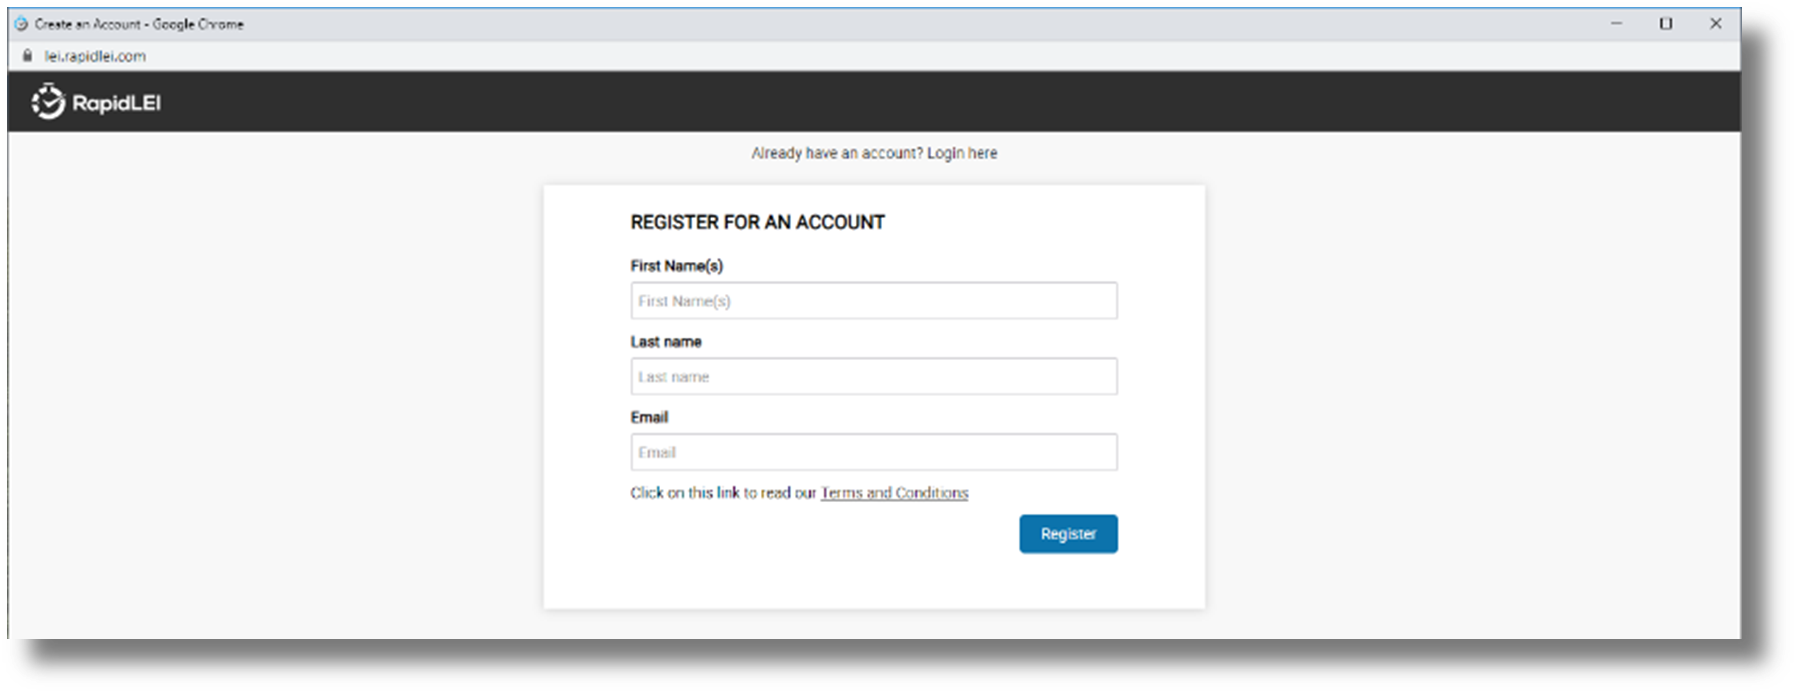
Pressing ‘Register’ will temporarily record this information. If you fail to complete the next step, then after 7 days the account will be deleted and only the record of an email being sent will be retained by the RapidLEI platform.
Please allow a few minutes for the email to arrive and be sure to check your Spam folder. As some mail systems such as Mimecast allow mail through only when a 2nd email is received, you can use the ‘Click here to send again’ function. Do not close this the window until you receive the email.

You’ll receive an email with an activation link. Please click on the link to proceed to the next step.

The final step is to Activate the Account.
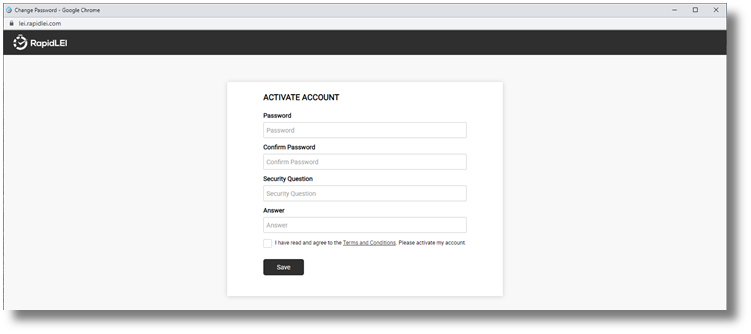
You can reset the password and the question/answer from ‘My Settings’ one logged in.
You must accept the Terms and Conditions before the account can be activated.
If you wish to review these now, they are here – https://rapidlei.com/documents/lei-platform-terms-of-service/. There’s also a privacy & cookie policy here – https://rapidlei.com/documents/privacy-cookie-policy/
Once the account is activated, we’ll take you to the DASHBOARD.
These icons indicate your shopping cart, Notifications and access to ‘My Settings’
The Dashboard tab
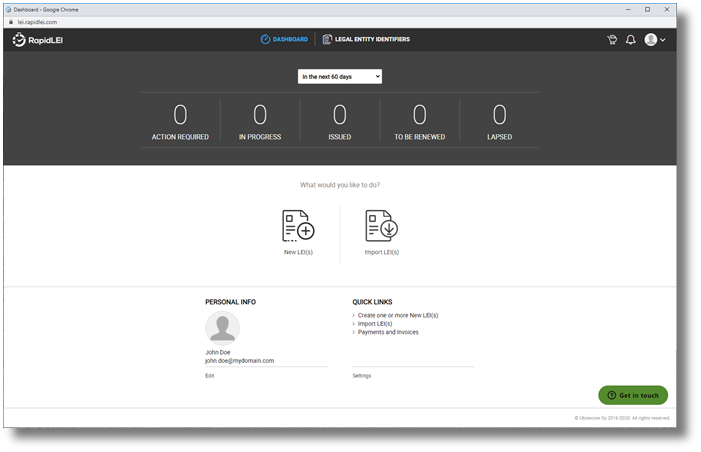
Here’s what the dashboard looks like when you first arrive.
These icons indicate your shopping cart, Notifications and access to ‘My Settings’

Plan effectively! – Each time you Log in, choose a view and see what’s happening in the next 60, 45 days, 30 days or 15 days. (Emails will remind you of renewals)
If there are any ‘Pending’ actions on you (e.g. to verify the accuracy of Data, or eSign a contract) we’ll show these in ACTIONS REQUIRED – As we speed through our activities they’ll move to IN PROGRESS They should not be there too long, but if they are, we’ll provide feedback on what data we are missing. Simply click on the IN PROGRESS to check. (See the LEGAL ENTITY IDENTIFIERS view.
Use QUICK LINKS or click on the ICONs to start a workflow either creating NEW LEI(s) or importing/transferring existing ones.
There are lots of options to customize the DASHBOARD especially if you intend to order multiple LEIs either for yourself, your corporate legal entity(ies) or on behalf of your clients – Yes you can offer a service to keep their LEIs up to date as part of your accounting or consultancy service – See our FAQ and web site for details – We call this functionality ‘Client Agent’.
Here’s a quick look at the possible roles and whether you need to talk to our teams to help you.
| Number of LEIs | Business size (role) | Notes |
| 1 | Small business or Sole Proprietor (Retail) | If you own the business or you are able to sign on behalf of the Legal Entity, then please ensure the account is in your Full Name as recorded on the business registry – you can check and amend in ‘My Settings’ or by Clicking ‘Edit’ below PROFILE INFO |
| 1 – 5 | Small Medium Enterprise (Retail) | The RapidLEI platform is ideal for SME users. A Letter of Authorization (LoA) may be required if you are managing the account on behalf of someone who has signing authority. |
| 5 – 20 | Small Corporate – Multi Country needs (Retail) | The RapidLEI platform is ideal for SME users. A Letter of Authorization (LoA) will usually be required if you are managing the account on behalf of someone who has signing authority. |
| 10 – 50 | Service provider – accounting or Finance (Client Agent) | Client Agents manage LEIs on behalf of their client(s), provided that a Letter of Authorization (LoA) is uploaded for each Request to prove permission. |
| 100-500 | Large Enterprise – (Enterprise) | The RapidLEI platform can be configured to remove the need for individual LoA(s) when an additional agreement is signed. Please talk to our Sales team – [email protected] |
| 500 – 2,500 | Bank*, Fund Management Company – (Enterprise) | Please talk to our Sales team – [email protected] as the RapidLEI platform supports ‘bulk’ new/import and single click renew and auto renew functions to ensure LEI management is fast and efficient. |
| 10,000 – 100,000+ | Service Provider (Registration Agent) |
Please talk to our Corporate Development team – [email protected] as the RapidLEI platform supports a full suite of API end points for LEI lifecycle management.
See https://documenter.getpostman.com/view/6519182/RztkQARN for details. |
* Banks managing LEIs on behalf of clients may become ‘Validation Agents’ – Please see https://rapidlei.com/lei-for-banks/
The LEI list tab
Whether you have a single LEI to maintain or multiple LEIs, the LEGAL ENTITY IDENTIFIERS list provides a snapshot of work in progress, LEIs you’ve issued, relationships etc. Tool tips will help you understand the various stages and indicators. When you first view the list it will be empty, so let’s run through the menus.

Create a NEW LEI – Please note that a new LEI is where there’s no existing LEI in existence. During the application we’ll double check as often as we can to make sure that’s still true before we issue.
IMPORT an existing LEI – For an LEI to be imported, the current Managing LEI Issuer has to be contacted and agree to the transfer, so importing can take several days, so please be sure to import in plenty of time if you have LEIs due to LAPSE
Search – If you only have a few LEIs to import then you may not need to use the search facility. There’s also a ‘Date Mode’ function to allow you to sort on key dates and you can also sort A-Z on Company Name, Number and Jurisdiction
If you have lots of LEIs to process, you can select some or all of the LEIs and download the list for post processing in popular spreadsheet applications.
Here’s a quick summary of the basic process to issue/import an LEI
- NEW LEIs are created, and existing LEIs managed by other LEI Issuers are IMPORTED, by choosing the appropriate button on the DASHBOARD or LEGAL Entity IDENTIFIERS list. (Renewing LEIs will be covered in a later chapter)
- The primary need is for you to confirm the LE-RD (Legal Entity Reference Data) otherwise known as Level 1 data, or business card data. e. your company name, number, address(es)…
- Once confirmed you’ll be able to eSign the terms of service agreement or forward to someone who can sign on your behalf.
- Finally, we’ll need you to confirm LE-RR (Legal Entity Relationship Records based on account consolidation) or LE-ER (Legal Entity Exception Reporting if no parents exist)
RapidLEI uses enhanced data gathering techniques to help make the process simple, but there may be several reasons why a business registry is offline, or an entity cannot be located. If this happens, our team will take over and during this time the LEI will move to ‘In Progress’. Once we’ve moved things forward the LEI will again be ‘Pending’ on confirmation or data from you. Let’s look at the ‘NEW LEI(s)’ workflow first…

Creating a New LEI
Please note that the example screen shots below are fictitious, to avoid unnecessary PII data being disclosed within this user guide.

If you know the company number please enter it here. It will usually provide an unambiguous result in the search result box (Assuming the Jurisdiction is correct). If you are applying for the United States, this will usually mean you need to enter the correct state. if you are applying from Canada then please either ‘federal’ or the relevant province.
- Please ensure your company name is correct, or the search term is accurate. If you don’t know then please enter the basic name. Avoid using Ltd or Limited as this may affect the results.
- Ensure the Country is correct. If we need to know the State (For example in the United States, or Canada an additional dropdown will appear.
- Select the Entity Type – Most LEIs are issued to Legal Entities, however LEIs can also be issued to FUNDs and TRUSTs, so these specialist options are available.
- If we don’t find the exact company name, we’ll provide a list of possible alternatives
- Sometimes the list is long, so we’ll give you the chance to View All.
- If we cannot find the details, you can manually enter. Please note that it’s better to search a few times to be sure it’s not found before you pick manual mode as this will require other manual steps later and manual entry is prone to typing mistakes – Please notice the example RAPID BANANAS LIMITED has a leading zero in the company number – this is an example of what can be missed if manual processes are followed.
Once you click ‘Add to Cart’ we’ll confirm.
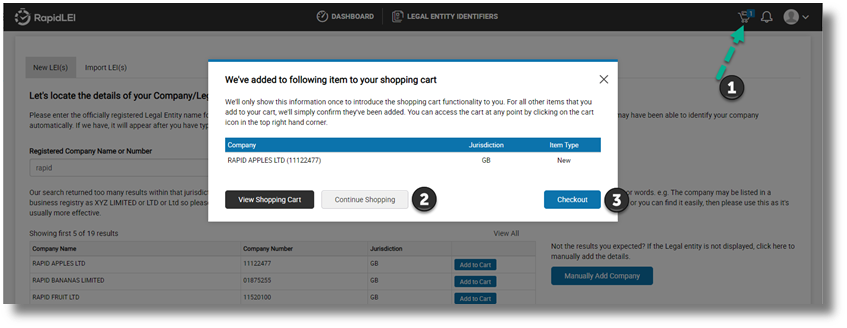
- Note that the number of items in the shopping cart is displayed in the top right corner
- You can Continue Shopping for more LEIs or
- If you wish, you can then move to the Checkout.
Let’s try to add one IMPORT before moving to the Checkout…
You can click on the Import LEI(s) tab.

- Enter the LEI Number to be imported
- Confirm the Country (and State if necessary) and press Search. All being well, you be able to confirm the details.
- Add to Cart will allow you to move forwards, or it will warn you if you cannot continue – for example, if the LEI is already managed by RapidLEI or a RapidLEI Partner.

OK, so let’s look at the import process later and focus on creation of the 3 NEW LEIs. Pressing the shopping cart icon takes you back to the LEIs already loaded.
If you log out and back in, we’ll remember the list.
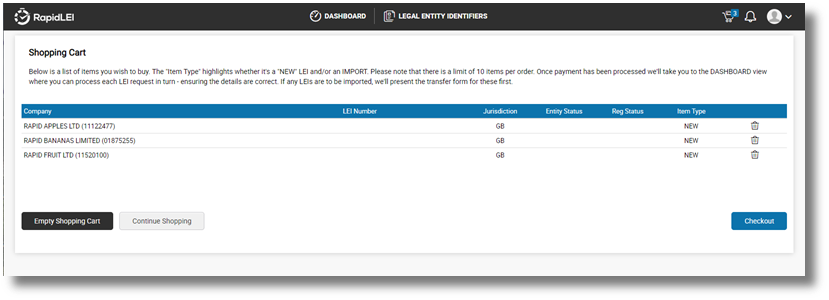
LEI Number, Entity Status & Reg (Registration) Status – In order to maintain a consistent GUI (Graphical User Interface) we maintain these columns as they are applicable to Imports and Renewals and the shopping cart can have all three at once.
You can upload this data later – However, if you already have a signed (LoA) or (EoA) then you can tick the appropriate check box and upload the evidence on the next page. If not, do not worry, as there are several opportunities to upload LoA / EoA or additional Corroborating evidence later.
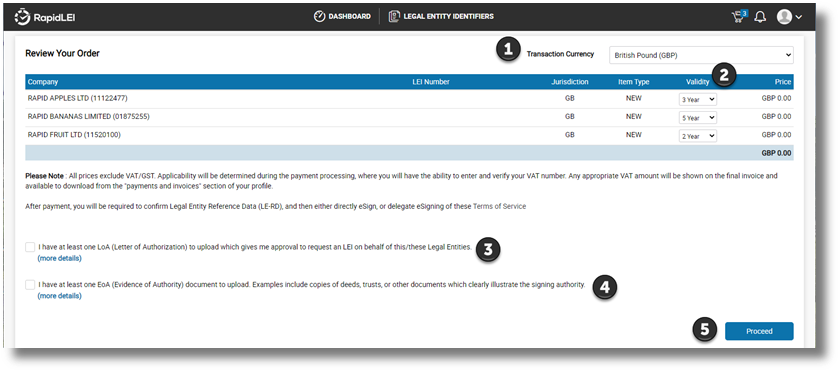
- For illustration purposes the Transaction Currency is set to British Pound (GBP) and the pricing to £0.00. For the latest pricing and multi-year discounts see https://rapidlei.com/lei-pricing/.
- LEIs may be purchased with a validity of up to 5 years. There is still an annual requirement to verify the data is current, however, the majority of LEIs issued to Legal Entities without a Level 2 parental structure are usually auto-renewed[1].
- Singular ‘retail’ LEI orders where the RapidLEI account holder is the business owner and therefore empowered to sign the Terms of Service do not require any other documentation. However, when applying for a Legal Entity where the RapidLEI account holder is NOT the business owner and therefore is NOT empowered to sign, then a Letter of Authorization (LoA) is required. Please see our FAQ for more specific details/templates.
- Most applications do not require additional evidence to be submitted, however in the case of Funds, Trusts, Pensions and other similar categories of LEI, there is usually no public source of data and no registry to refer to. For these examples, Evidence of Authority (EoA) is required. This is typically a copy of a deed illustrating the key Level 1 details to be included in the LEI. It is also true for a small number of business registries. For example, Delaware in the United States. Signing Authority empowerment is not recorded by the registry; therefore, a copy of the articles of incorporation or memorandum of understanding is usually required to prove empowerment.
- Pressing Proceed moves to the payment page (not illustrated in this guide) and then to the LEGAL ENTITY IDENTIFIERS view where each LEI will be ‘Pending’ confirmation from you or ‘ In Progress’ with our vetting team if we’ve been unable to automatically gather the data.
- At this stage, pressing the ‘Actions’ button and selecting ‘Resume my LEI application’ allows you to proceed
Here’s the 1st opportunity to upload data – You can use the ‘Actions’ button to select the appropriate file category to upload.

Whether you are applying for your own LEI or on behalf of another entity, you will need to agree, or disagree to the data presented on this screen. Please note that all items marked with a red (*) are mandatory[2].

- If you have already indicated a Signing Authority, we’ll highlight that name at the top of the page. If you are unsure who is empowered to eSign we’ll offer choices on the next page.
- The LE-RD Level 1 data is very important and needs to be accurate, matching the local business registry 100%, ideally with the same capitalization and the same company number format. Although not illustrated above, if we find alternative names (i.e. Trade names, Doing Business As, or previous names/alternative language names then we’ll also include these too.)
- The Legal Address is defined by CDF V2.1+ as shown opposite.
This means the address recorded within the business registry, noting that may be the address of an Agent for service of process. - The Headquarters Address is defined by CDF V2.1+ as shown opposite.
In most jurisdictions, this address has some level of flexibility, but in some, based on the ELF code used, the addresses MUST match the registry. Please note that if the business registry supports multiple addresses and both the Legal and the Headquarters addresses can be verified against the details in the registry, then these will be FULLY_CORROBORATED[3].
Google Maps is there to help you – Please note that some addresses, especially if they have a ‘care of’ c/o, do not always render in the Google Map view. The map function is there to aid you construct a meaningful Level 1 address, but it should not force you to remove key items.
Entity Legal Forms (4 Digit ELF codes) compliant to ISO 20275 are automatically selected. The form will either have: –
- A description of the Legal Form and the corresponding ELF code, e.g. H0PO
- A description and if no ELF code exists for that specific legal form then 8888
- A description and if that jurisdiction does not support ISO 20275 then 9999
We do all the hard work! – The RapidLEI system uses sophisticated algorithms to present the data in the correct format. We’ll ensure the Entity Legal Status allows and LEI Number to be issued and anything we replace such as ‘Country’ or ‘State/Region’ will be highlighted with an information (i). If the data is correct, we’ll save you typing again and let you use either the Legal or Headquarters (physical) address for your invoice.
Registration Authorities are allocated by the GLEIF. Several may be available within your jurisdiction of incorporation. RapidLEI usually picks the most appropriate RA automatically.
If you ‘Agree’ to the LE-RD data we’ve presented at this stage, you’ll be able to proceed to eSigning the Terms of Service. If you ‘Disagree’ then either tell us why or correct the data. We’ll then process your feedback.
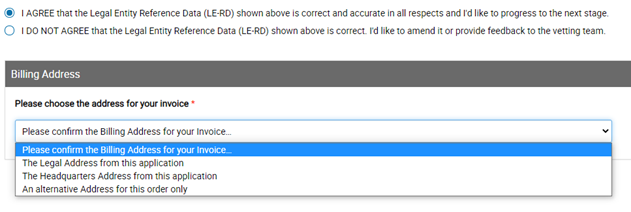
You’ll have the option to amend the invoice address to match the one of the addresses from your Level 1 data, or to provide an alternative address for this single application. If configured, you can also choose the address from ‘My Settings’, or save these values to ‘My Settings’.
[1] Auto-renewal assumes that the data remains consistent year on year. The RapidLEI vetting team will verify this with the relevant business registry. If it’s true the LEI is renewed. If there have been changes then the vetting team will reach out for clarification. All this happens 60 days prior to the renewal deadline to avoid LAPSING which is a major advantage of Multi-year.
[2] Exceptions are ‘Entity Supplied Only’ LEIs such as Funds – In this case n/a (not applicable) will be inserted but this will not appear within the Common Data Format (CDF) eXtensible Markup Language (XML) files submitted to GLEIF.
[3] If changes are acceptable, and alternative Address may be used, but the record moves to PARTIALLY_CORROBORATED. The RapidLEI support team will be happy to help in the event of any questions. ([email protected])
eSigning the Terms of Service
Agreement to the Terms of Service is mandatory. If you need to create, or import > 50 LEIs then please talk to our sales team ([email protected]) as we have more efficient ways of processing the necessary agreements.
eSigning takes place after we’ve verified the LE-RD. This ensures the contract we create, can apply the verified company name and verified company number. We’ve implement a web based application from our friends at www.signinghub.com and there are several ways to proceed.
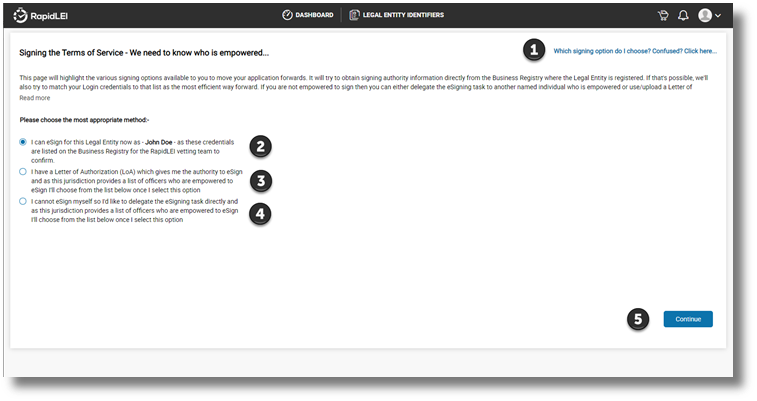
- If you need guidance and you don’t have this user guide handy then this link will help you.
- This is the most popular option for singular orders when your First Name(s) & Last Name (chosen at sign up time and modified in ‘My Settings’) match the detail of the empowered signing authority in the registry. If you are confident it matches you can continue to (5). If you are NOT empowered, don’t worry as we have two options. You can either upload an LoA (Letter of Authorization) from someone who is empowered and has given you permission (3), or you can delegate the eSigning task via email (4).
- If you click on the 2nd option and a list of names appears, then it means our direct API link with the business registry has highlighted how can sign or our vetting team have manually added a list of names. You can pick one and upload the appropriately signed LoA. Do not worry if you do not have the document to upload, you can move back to the DASHBOARD, or the LEGAL ENTITY IDENTIFIERS view and the status will change to ‘Awaiting Signature’ – Our team might well see this and update the Status of the LEI providing feedback on what to do next as shown in the example below.
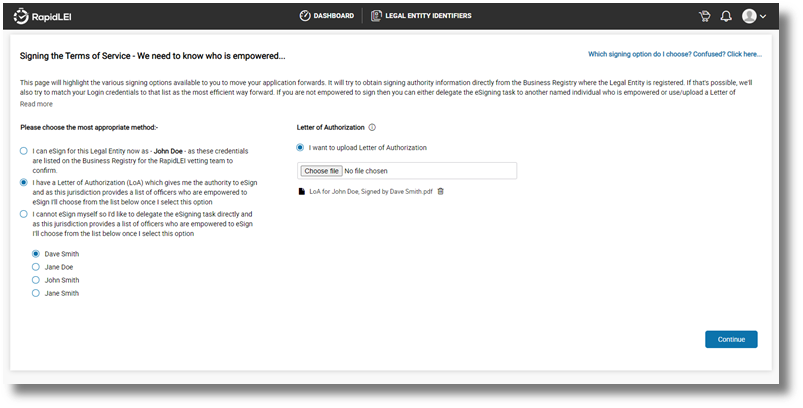
- A useful alternative is to delegate the eSigning Activity to someone who is empowered by email. This third option will also provide a list of names if possible or allow you to send to an alternative person not listed as shown in the example.

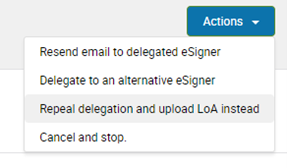
If you do forward to an alternative signing authority by email and for some reason they decline, or you wish to delegate to an alternative signer, or you wish to sign yourself and upload an LoA instead, then all these options are available from the Actions menu:-
If you are empowered or you have uploaded and LoA granting you empowerment to eSign then please press ‘Continue’ and the contract will be created.
A Signing Authority (let’s illustrate as a green icon) who is empowered to sign on behalf of a Legal Entity, can grant approval to an Applicant (RapidLEI user illustrated as a black icon) via a signed Letter of Authorization.

What happens if there are no names to choose from? Sometimes this happens. For example, if the registry does not record names, or the LEI is for a Fund/Trust. In these cases, please upload additional data to prove the empowerment. We call this ‘Evidence of Authority’:

Examples which highlight the empowered signing authority are Articles of Incorporation, MOU, Board Resolution or a link to the Board members indicated on a corporate web site.

You can upload documentation at any point by clicking on the Actions menu:

The RapidLEI Platform prepares the contract, ready for eSigning including your Entity Name and Number. You’ll find the Terms of Service on our website https://rapidlei.com/documents/global-lei-system-terms/
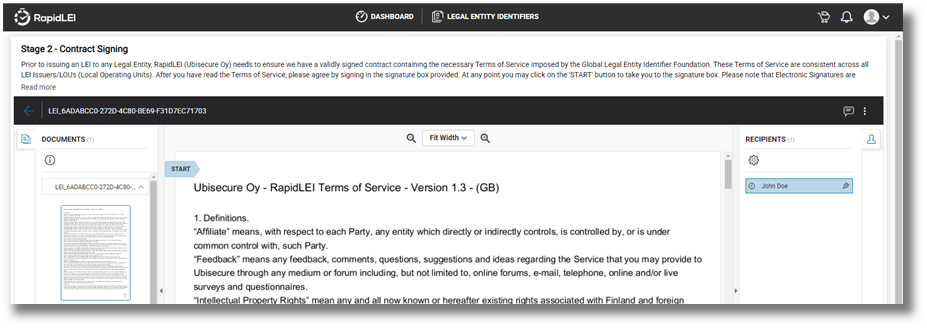
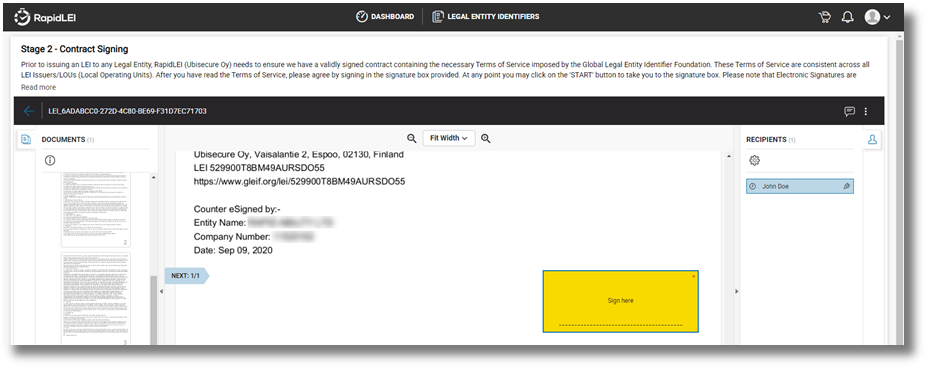
Choose a style that suits your company processes. Text, draw or upload and choose SIGN NOW


Level 2 Parental Structures
Try to remember the simple rule – No consolidation of Accounts = No Parents!
Introduced to the GLEIS in May 2017, Level 2 data answers the question of ‘Who owns Whom’ and is a mandatory requirement to report. (Although expectations are available for exceptional circumstances. For example, if your business reputation could be damaged if the level 2 data were to be made public.)
Please note that Level 2 reporting is focused on Accounting Consolidation. If you do not consolidate with a parent (Direct or Ultimate) then under the definition for level 2 you do not have parents and you may report exceptions. There is also the special case where you may be an ‘INTERNATIONAL_BRANCH_OF’. We’ll deal with this later in this chapter.
| Direct Parent | Ultimate Parent | Reference Data (LE-RD) | Relationship Record (LE-RR) |
Parent Reference Data (PRD)* |
Exception Record (LE-ER) |
| Does not Exist | Does not Exist | Yes CDF | – | – | and |
| Does not Exist | Exists (LEI) | Yes CDF | Yes | – | |
| Does not Exist | Exists (no LEI) | Yes CDF | – | Yes | and |
| Exists (LEI) | Does not Exist | Yes CDF | Yes | – | |
| Exists (LEI) | Exists (LEI) | Yes CDF | Yes & | – | |
| Exists (LEI) | Exists (no LEI) | Yes CDF | Yes | Yes | |
| Exists (no LEI) | Does not Exist | Yes CDF | – | Yes | and |
| Exists (no LEI) | Exists (LEI) | Yes CDF | Yes | Yes | |
| Exists (no LEI) | Exists (no LEI) | Yes CDF | – | Yes & | and |
| International Branch Office | Yes CDF | Yes (Branch) | n/a (Head offices MUST have LEI’s) | n/a (Head offices MUST have LEI’s) | |
| Fund | Fund is a special Entity Category, however reporting of Level 2 information is still applicable if the fund consolidates to other entities. | ||||
| Sole Proprietor | Sole Proprietor is also a special Entity Category, however reporting of Level 2 information is still applicable even though in most cases this will be LE-ER only | ||||
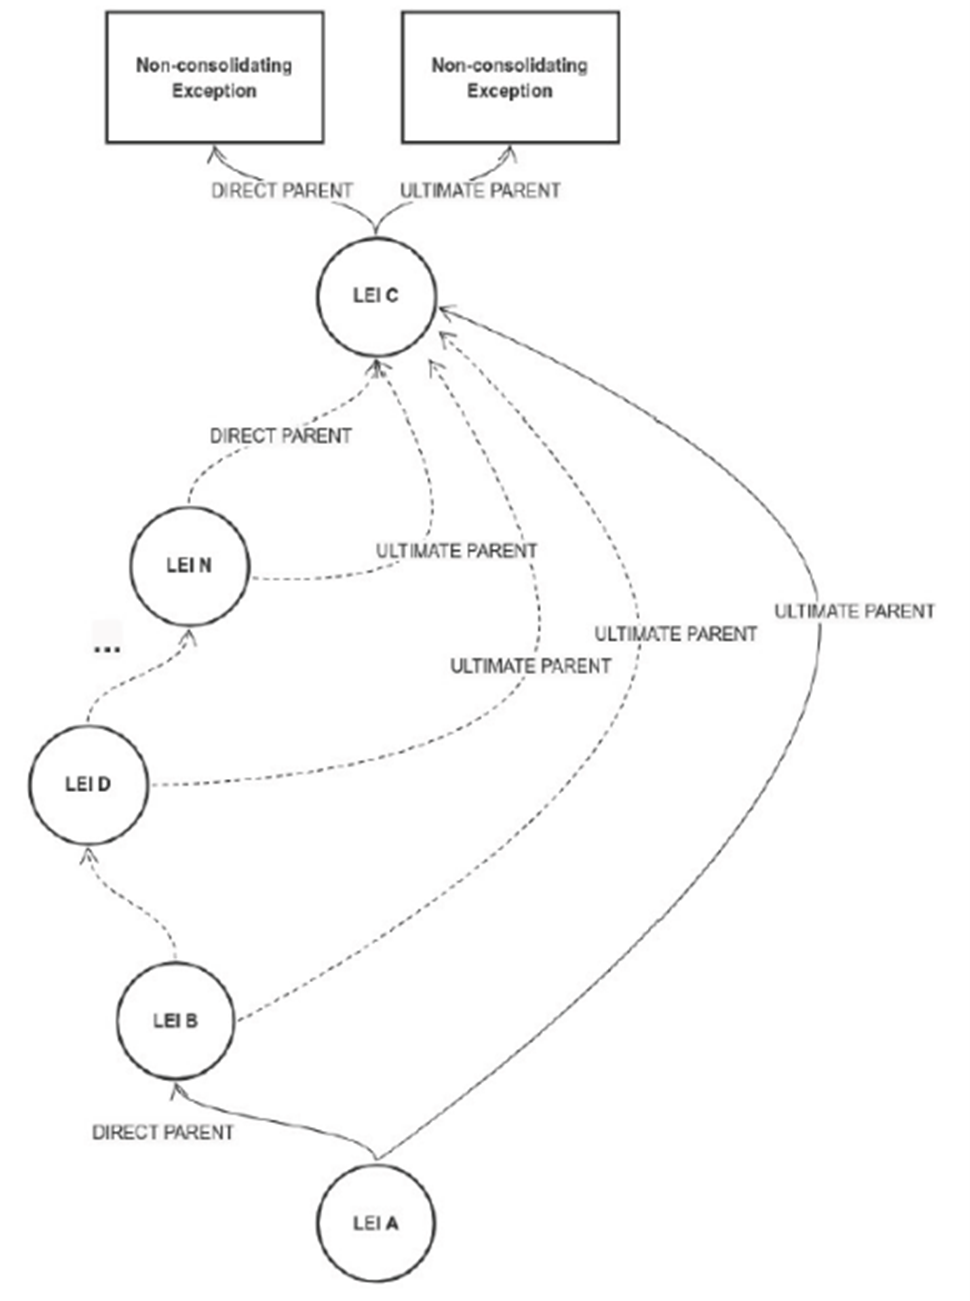
Here’s an example DIRECT/ULTIMATE structure of consolidation (LE-RR) and reporting exceptions (LE-RE). If you do not consolidate accounts, then you can pick the most appropriate reason and choose ‘Next’, ‘Next’ and Submit.

If you do consolidate, then you need to let us know the LEI of your Direct/Ultimate parents, or the details of the parent if they do not yet have an LEI Number.
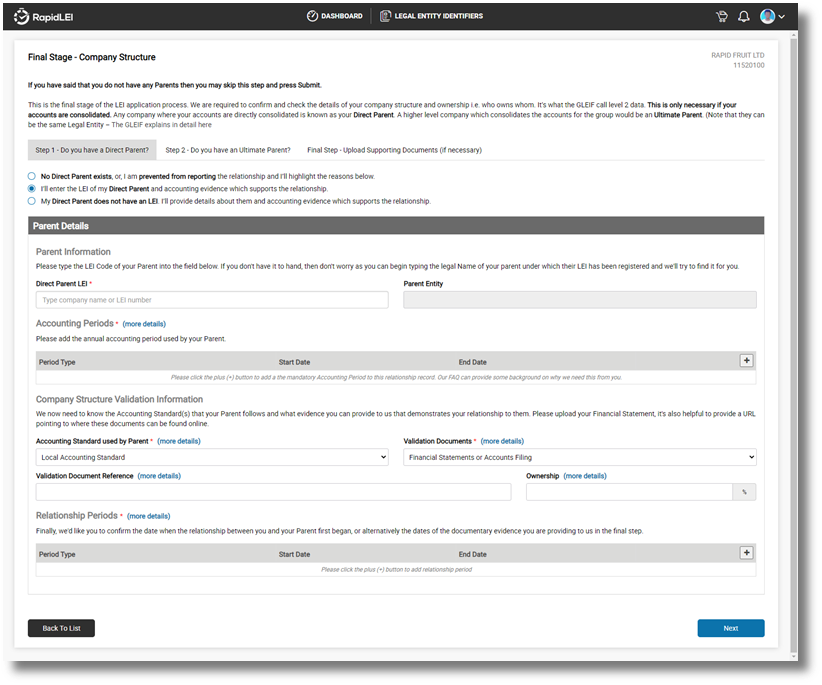
In GLEIF terms, you are classed as the ‘Child’ Entity. If you do not consolidate accounts then you do not have any Parents then you can select the 1st option, choosing, Next, Next and Submit to complete the process – See next page…
Direct Parents Details – In this first tab, select whether your parent has an LEI Number or not. If you are not sure simply type their name and we’ll present a list of choices.
If you know they do not, then select the 2nd option and enter their details. Our forms will use the same algorithms that we used to identify you to help ensure accuracy.
The Relationship Period, which is also mandatory, can be added below. (This is the date at which this relationship between parent and child began)
Accounting Practices followed? – We’ll need to know if the accounting practice is ‘Generally Accepted Accounting Practice’ or alternative ‘Local Accounting Standards’. Our FAQ has lots of information to help you decide.
Finally, we need to know the type of Validation Document you’ll be submitting to us, or the external web address/SEC filing link etc. Again, there are lots of examples listed in the FAQ section of our web site.
If your Parents do not have LEIs, we’d still like to know who they are. This data will be submitted to the GLEIS system but will not be made public by the GLEIF. An exception of NO_LEI is used.

Use our built-in tools to help improve data quality of submitted Parental Data in multiple jurisdictions.
Many of the jurisdictions we support have the ability to directly connect to the business registry to obtain accurate Company Names and Company Numbers for Parents, but in the event that we cannot locate the correct details, please enter these manually. Our vetting teams will corroborate the data with copies of accounts submitted in the final step.
When you have completed this form for the Direct Accounting Parent, click ‘Next’ and complete the request for the Ultimate Accounting Parent (They may be the same if there’s a single parent).
Finally, if you’ve not provided a web link to a relationship document in the previous section, then please upload a document. If you can provide a useful name for the document that includes a page reference to the relationship it will help us verify the data and therefore speed up your application. e.g.
Consolidated Accounts for XYZ Limited 2020 (Relationship to parent ABC Inc on page 22).pdf
If you change your mind – No problem – If you decide the document you’ve uploaded isn’t suitable after all, then select the ‘bin’ icon to remove it.
Please note that in the renewal workflow, we’ll keep the previous documents to help you see what you uploaded last time.
Consolidated Accounts for XYZ Limited 2020 (Relationship to parent ABC Inc on page 22).pdf
This is all about efficiency speed and accuracy, so our team really appreciates any help you can provide to point us in the right direction.
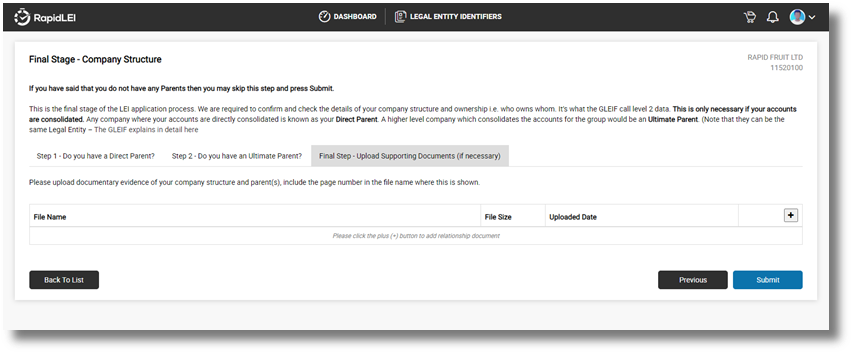
If we are able to issue the LEI automatically we will let you know on the next screen. If not, we’ll inform you, and our vetting team will process your application as soon as possible. Any level 2 data uploaded to the system will always need our team to look at the details – only reporting exceptions have the ability to be immediately issued.
Level 2 edge cases – International Branch offices
Full background details on this subject are available from the 2016 LEI-ROC[1] document, but in very simplistic terms, a head office may nominate a single INTERNATIONAL BRANCH per country to obtain a LEI Number. The Head Office must have its own LEI and it must not be LAPSED. If the Head office LEI does LAPSE, then the INTERNATIONAL BRANCH will also LAPSE. The RapidLEI system uses the foreign/overseas nature of the record from the Business Registry to identify an entity as a Branch and request confirmation the LEI is required.
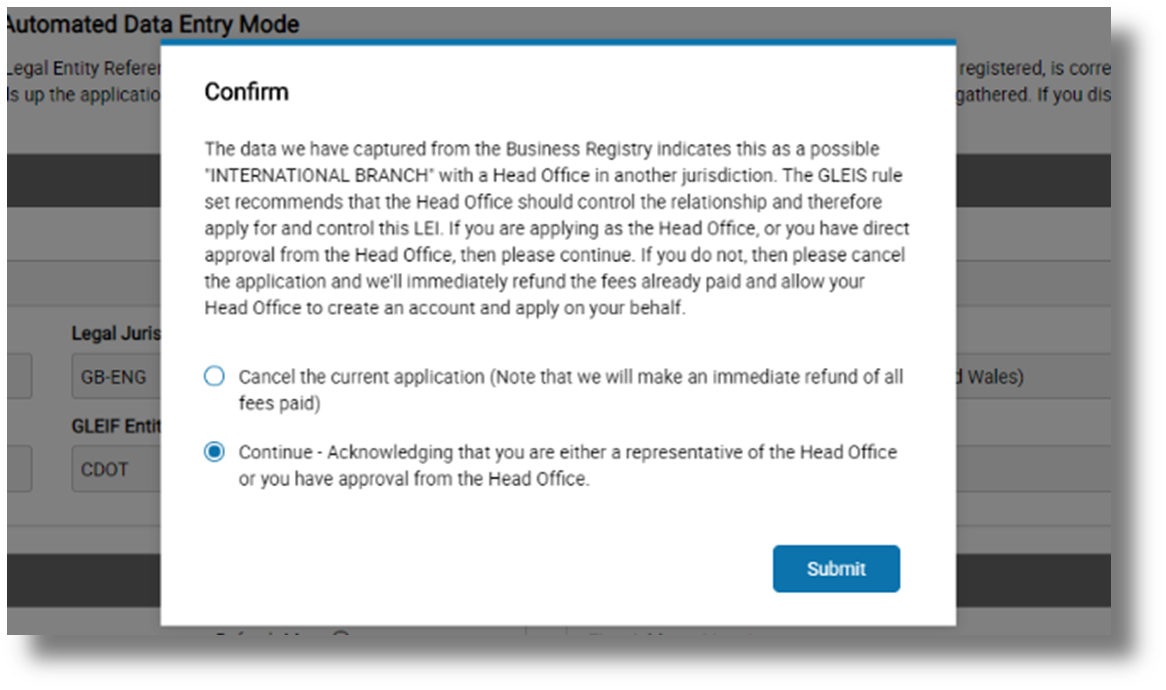
Please NOTE that only International Branches may obtain an LEI Number. Foreign Qualification of a Delaware based corporation in an alternative US state does not qualify. The qualification must be outside of the United States for the branch to be recognized as ‘International’
The Level 2 page for an International Branch looks slightly different to the usual Level 2 as there’s only one Tab for the Head Office LEI details and one tab for any supporting documents.
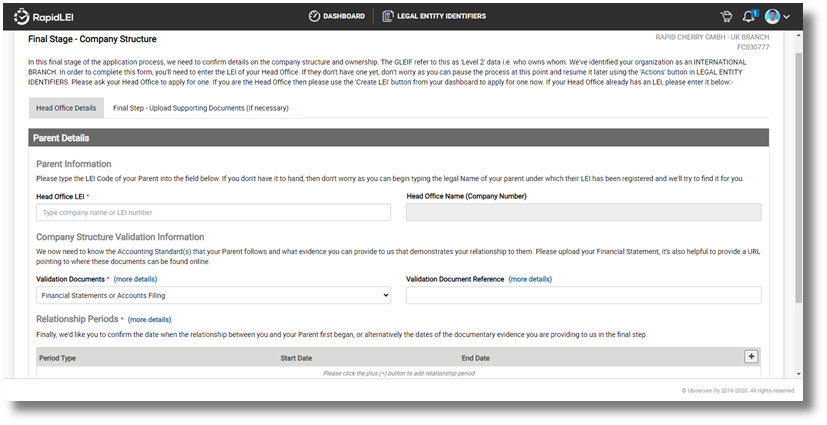
International Branches do not ordinarily consolidate accounts, so the default Validation Documents usually flip to ‘Other Official Documentation’ which is most usually the information from the Business Registry.
Branches are Indicated via the ( ) indicator as shown in the screen shot below.
Whilst we are looking at the LEGAL ENTITY IDENTIFIERS list page, let’s look at a few of the key features designed to help you understand where to focus.
Level 2 Reporting Indicators – Instantly see whether you have reported Direct or Ultimate parents that :
have an LEI ![]()
![]()
do not have an LEI ![]()
![]()
or do not exist at all ![]()
![]()
or combinations like ![]()
![]()
Here are some of the other possible filters you’ll encounter. The Glossary of Terms at the rear of the guide covers these in detail.
It’s always best to clear anything that’s ‘Pending’.
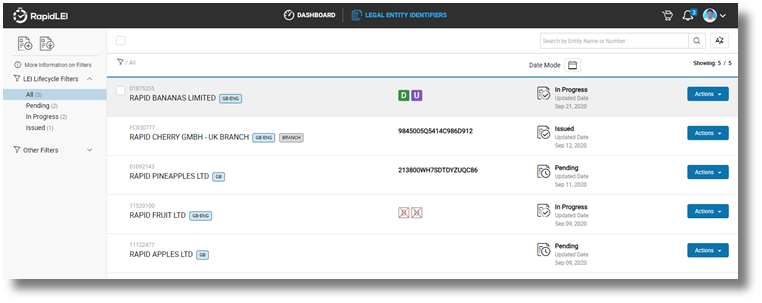
Level 1 Identity Summary – See the Entity Legal Name, the Registration Authority Entity ID, Jurisdiction and the LEI Number.
[1] The LEI ROC (LEI Regulatory Oversight Committee) provided the background on including international/foreign branches in the Global LEI System here https://www.leiroc.org/publications/gls/roc_20160711-1.pdf
Importing (transferring) an LEI
Please note that the example screen shots below are fictitious, to avoid unnecessary PII data being disclosed within this user guide.
So far, we’ve only briefly covered Imports (Transfers), so now, let’s take a deeper dive. Let’s answer a simple question – ‘Why do LEIs need to be imported (transferred)?’
LEIs need to be maintained. Every day, in fact multiple times per day for RapidLEI, we upload the entire database of managed LEIs to the GLEIF. All our LE-RD, LE-RR and LE-RE data along with other LEI Issuer (Previously known as Local Operating Units (LOUs)) data is combined by the GLEIF into a singular ‘Concatenated’ [1] file as well as a singular ‘Golden Copy’[2].
Only one LEI Issuer may ‘manage’ the LEI at any one time. Speed, accuracy of data as well as other services determine the best choice of LEI issuer. As of September 2020 RapidLEI, issues roughly 1 in 5 of all New LEI’s globally. Our growing customer base therefore move any existing LEIs to us to manage (amend/update and renew).
The process is as follows and has these three main participants: –
Sending LOU – This is the LEI Issuer currently managing the LEI
Receiving LOU – This is the LEI Issuer wishing to manage the LEI in the future (i.e. Importing it i.e. RapidLEI)
The Legal Entity – This is the business or owner of the LEI wishing to move it
- The Legal Entity requests the Receiving LOU to import the LEI on their behalf
- The Receiving LOU verifies the LE-RD data and empowerment to request and if approved submits a TRANSFER REQUEST form to the Sending LOU.
- The Sending LOU has 4 days to contact the Legal Entity to approve the transfer, during which time the Sending LOU sets the Registration Status of the LEI to PENDING_TRANSFER
- If approved by the Legal Entity, the Sending LOU sets the Registration Status of the LEI to PENDING_ARCHIVAL and the Receiving LOU has 3 days to complete the Import and set the Registration Status to ISSUED
- If the Legal Entity objects, the Sending LOU sets the Registration Status back to the previous state.
Once you click on the Import LEI(s) icon you’ll be presented with a form

- Enter the LEI number to be imported from the Sending LOU currently managing the LEI to RapidLEI
- Ensure the Country is selected (To help verify the LEI selection)
- Optionally highlight the entity type
- Select ‘Search’
In certain jurisdictions you may be required to select the appropriate state (US) or province (Canada) etc

If the LEI Number is found and it can be imported, we’ll confirm the results
An Entity Legal Status can be either ACTIVE or INACTIVE
Imports are allowed if the Registration Status is ISSUED or in some cases LASPED with special cases of RETIRED or MERGED.
Imports are not allowed if ANULLED, DUPLICATE, PENDING_TRANSFER or PENDING ARCHIVAL.

If the Registration Status is either RETIRED or MERGED then we’ll ask you for some additional background information on why you wish to import these LEIs to RapidLEI. Tis information will be sent directly to the Sending LOU currently managing the LEI.
As we’ve seen on the previous table, filling in the Transfer Request form for an import takes priority, so let’s look at this first.
If you see this message the LEI may already be managed by RapidLEI through a partner. Please speak to our support team if you are in any doubt. [email protected]

Once you have processed payment to import the LEI, you’ll be presented with the Transfer Request Form. This is where you highlight the details of the authority requesting the import. Please note that we are required to take slightly more detailed information such as phone number and email of the person making the request. These should ideally match the empowered individual who usually signs LEI terms of service. If not, then LoA’s need to be uploaded. These additional details are mandated by the GLEIF, as is the content of the transfer form.
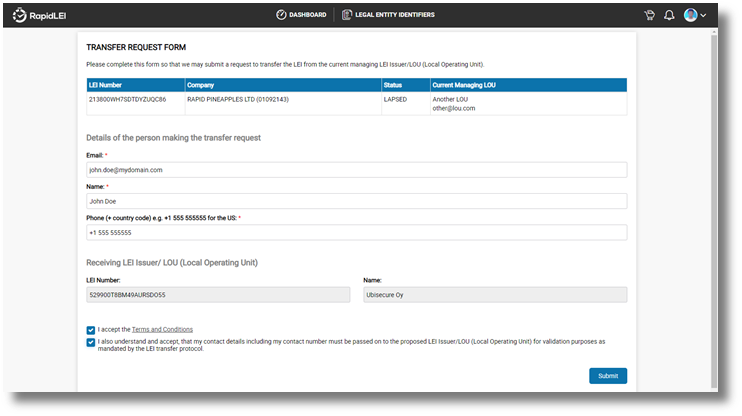
From a GDPR (General Data Protection) perspective, we’ve used “Privacy by Design” principles, and therefore we only take data from you when we need it and only for a specific reason. Here is one of those times. We need to inform the current managing LOU of a phone number as the GLEIF transfer rules mandate this data is sent.
Except for your phone number (unless you have added it) data will be populated automatically from “My Settings” and from data in the CDF record of the LEI to be imported.
If you don’t have permission to request the transfer you can change these details to allow the existing LOU to decide. This may be the name and email of a colleague who is empowered if you are not.
If you are transferring multiple LEIs at once, the system will allow you to submit each Transfer Request individually, or if the LEIs are for a single group of companies with the same authority, then they can be sent all at once.
Once the transfer form has been submitted, we’ll take you to the LEGAL ENTITY IDENTIFIERS list where you can choose ‘Resume my LEI application…’ for each LEI you wish to import and the process from this point is identical to the creation of a new LEI.
Here’s a basic overview of the process…
| Legal Entity (i.e. You) | Receiving LOU (RapidLEI) | Sending LOU (Managing LOU) | Registration Status | Notes |
| Request made to Import/ Transfer the LEI | Check LE-RD, LE-RE/LE-RR and if OK Submit the Transfer Form | Must be either
ISSUED, LAPSED, RETIRED or MERGED |
If RETIRED or MERGED RapidLEI will need to know why you are transferring.
ANULLED/DUPLICATE/PENDING_XX cannot be transferred. |
|
| Wait | Wait | Receive Transfer Form and Check with Legal Entity | Set to PEDNING_TRANSFER | The Managing LOU has 3 days to obtain approval or rejection to the request. |
| Approves the Transfer | Monitor Status and Action. RapidLEI will ISSUE the LEI | Accept the Transfer | Set to PENDING_ARCHIVAL | RapidLEI has 4 days to import the LEI, however as all work has been done already the Import Process is immediate |
| Rejects the Transfer | Monitor Status and Action | Reject the Transfer Request | Set back to the previous Registration Status |
[1] Details on the Concatenated files can be found here https://www.gleif.org/en/lei-data/gleif-concatenated-file
[2] Details on the Golden Copy Files can be found here https://www.gleif.org/en/lei-data/gleif-golden-copy
Checking the status of an LEI registration
The RapidLEI vetting team perform their mandatory checking actions as quickly as they can, but sometimes the information they need isn’t available on the registry, or the registry is offline, or in the case of FUNDs there usually is no registry, so they need additional proof(s) from you.
When it’s ‘Pending’ then it means it’s your turn to move the order forwards; This may be to verify data we’ve found or to simply move to the next stage in the process such as uploading Level 2 data.
Generally, when it’s our turn to do something, the activity will be ‘In Progress’, but please do check there for details too. We’ll inform you via the messaging system (See below for an example)

Regularly Check the ‘In Progress’ filter.
We’ve mentioned that Pending orders require action from you, but sometimes the action is with our Vetting team (i.e. the order is “In Progress”). If we are delayed, for example a business registry is offline, we let you know. However, we may need your help to submit additional information or, as in the example opposite, documentation to help us verify the Signing Authority.
When does my LEI Code appear in the GLEIS database?
Sometimes our fully automated systems will take your requst completely through the process without any aditional checks being necessary. In this case, you’ll immedaitely see the LEI has been issued and published (‘Issued’ filter), or is about to be issued (‘Ready to Publish’ filter). You may also see your LEI in the ‘Authority Check’ filter. This is where we are checking documentation such as the LoA before we can issue it. Here there’s a very good chance the LEI number will remain the same, but only when those checks have been completed is the number valid.
Once we’ve issued the LEI and published to GLEIF it can take a number of hours to become ‘live’ within the GLEIF searches. Serach 1.0 is being deprecated at the end of 2020, so this guide will focus only on Serach 2.0 (https://search.gleif.org/) which is updated 3 times per day for the 3 main time zones. If you miss one 8 hour slot, you’ll catch the next so roughly speaking it takes bewteen 3 and 11 hours once we issue it.

Taking the 08:00 UTC publication…
Rapid LEI publishes 9 times per day. The 3rd set at 07:00am is used at 08:00am by GLEIF to build their ‘Golden Copy’ in roughly 30 minutes and between 2 and 5 hours later LEIs will appear on Search 2.0.
What happens if the Business Registry is offline
Virtually all Business Registries close for periodic maintenance and some even close overnight to consolidate their daily database activity. Here’s what happens in this situation.

Business Registry offline? If the business registry is offline, or information from the registry is incomplete, you’ll be offered the opportunity to complete the process manually. It’s same process for correcting errors or adding alternative trading names when you ‘DO NOT AGREE’ to the data we’ve found.
Once you’ve submitted comments or manually entered details our team will quickly verify the data. This may only be possible if the business registry is back online, so many thanks for your patience.
As soon as we’ve completed our validation, we’ll send you an email to resume the application in which case the LEI will move to ‘Pending’.
Customize the Dashboard
If you’d like to make things more personal, then you can upload a photo or avatar and configure other settings such as default billing address, time/date format and even add Address Profiles to make it faster to update address data for multiple existing LEIs or make it quicker to provide Headquarter addresses for new LEIs. All these can be managed in ‘My Settings’.
Click on the down arrow in the top right-hand corner and select ‘My Settings’. Alternatively, in the DASHBOARD view choose the ‘Edit’ link in the ‘PERSONAL INFO’ section.
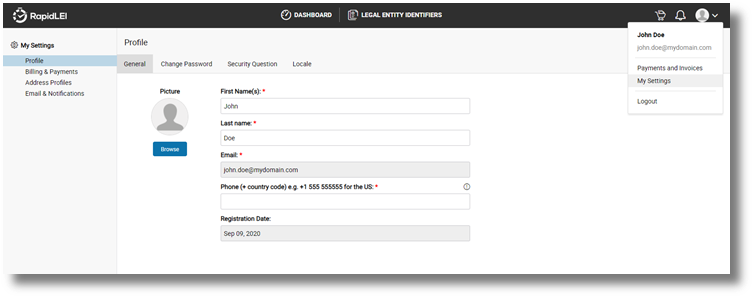
Change your Picture: Use the Browse to choose a file which can be a photo or an Avatar and use the cropping functions to select the best size (square is best).
Update Email address: You cannot amend your email address, but you are free to amend First Name(s) and Last Name or add your phone number if you wish to speed up the process of importing.
Address Profiles: is a useful function that allows you to add multiple addresses to your account and to use these when applying for LEIs. It’s very efficient where multiple FUND based LEIs are needed i.e. where there’s no registry to connect to and therefore manual entry is required.
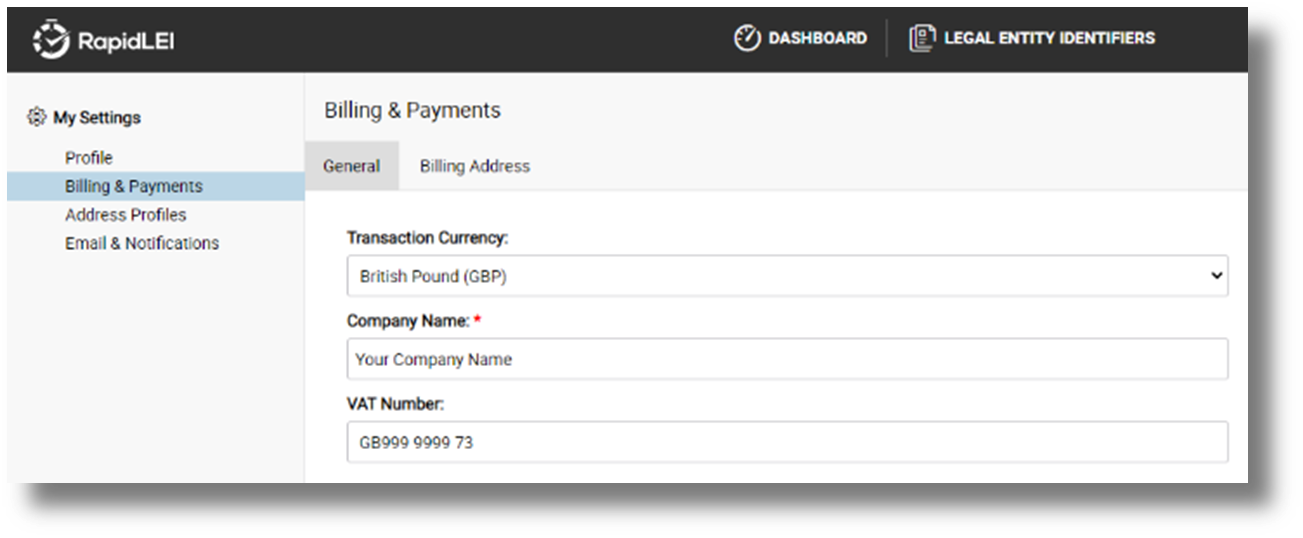
Billing & Payments: allows you to configure a default Billing Address and confirm your VAT/GST number, Company Name and Transaction Currency. For additional questions relating to specific billing issues, please see the RapidLEI FAQ.

Email & Notifications: allows you to turn on/off various emails and in-app notifications. We only suggest doing this if you are a partner of RapidLEI and managing a large volume of LEIs with alternative renewal tracking reminders etc.

Payments and Invoices: allows you to view the orders you have made, tracking New LEIs, Imported LEIs and later on renewed LEIs. If you requested several LEIs in a single transaction, you’ll see the ‘BULK PAYMENT’ icon and the Company Numbers for each LEI requested (Up to 10). The detail of the order can be reviewed by clicking the left hand side icon, and the invoice can be reviewed by clicking the right hand side icon.
Renewing LEIs
The renewal process has been streamlined to help you.

Use your DASHBOARD to help guide you
If you select 15 days from the dropdown, the dashboard will display the LEIs which are due to expire in the next 15 days. You can renew up to 60 days prior to LEI expiry, so it’s always better to act quickly and renew early, so 60 days is recommended. Click on TO BE RENEWED or LAPSED to continue.
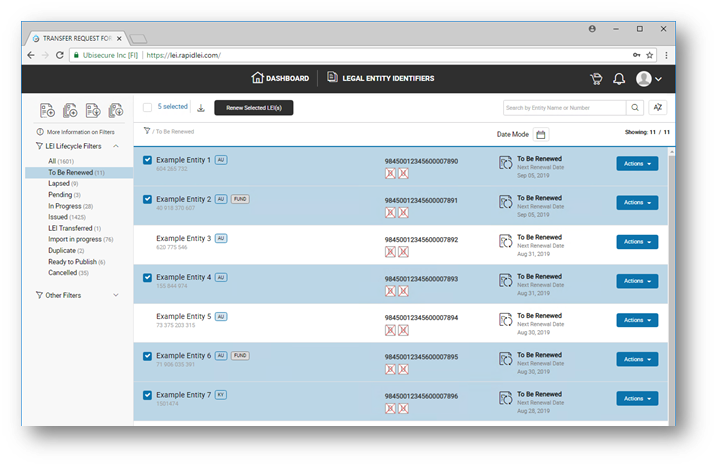
You can renew ‘Renew Selected LEI(s)’ or individually
Each individual blue ‘Actions’ button allows all LEIs, or a single LEI to be renewed. Alternatively to renew all at once, please select the black ‘Renew Selected LEI(s).

LEIs can be added all at once by selecting the tick box and any selected LEIs can be exported to and xlsx file for onward processing, checking or invoicing customers and partners.
Let RapidLEI do all the heavy lifting
The concept of the renew function is very simple. We’ll do all the heavy lifting for you. We’ll find the necessary data from the business registry and process your application swiftly if it’s from one of our fully automated jurisdictions.
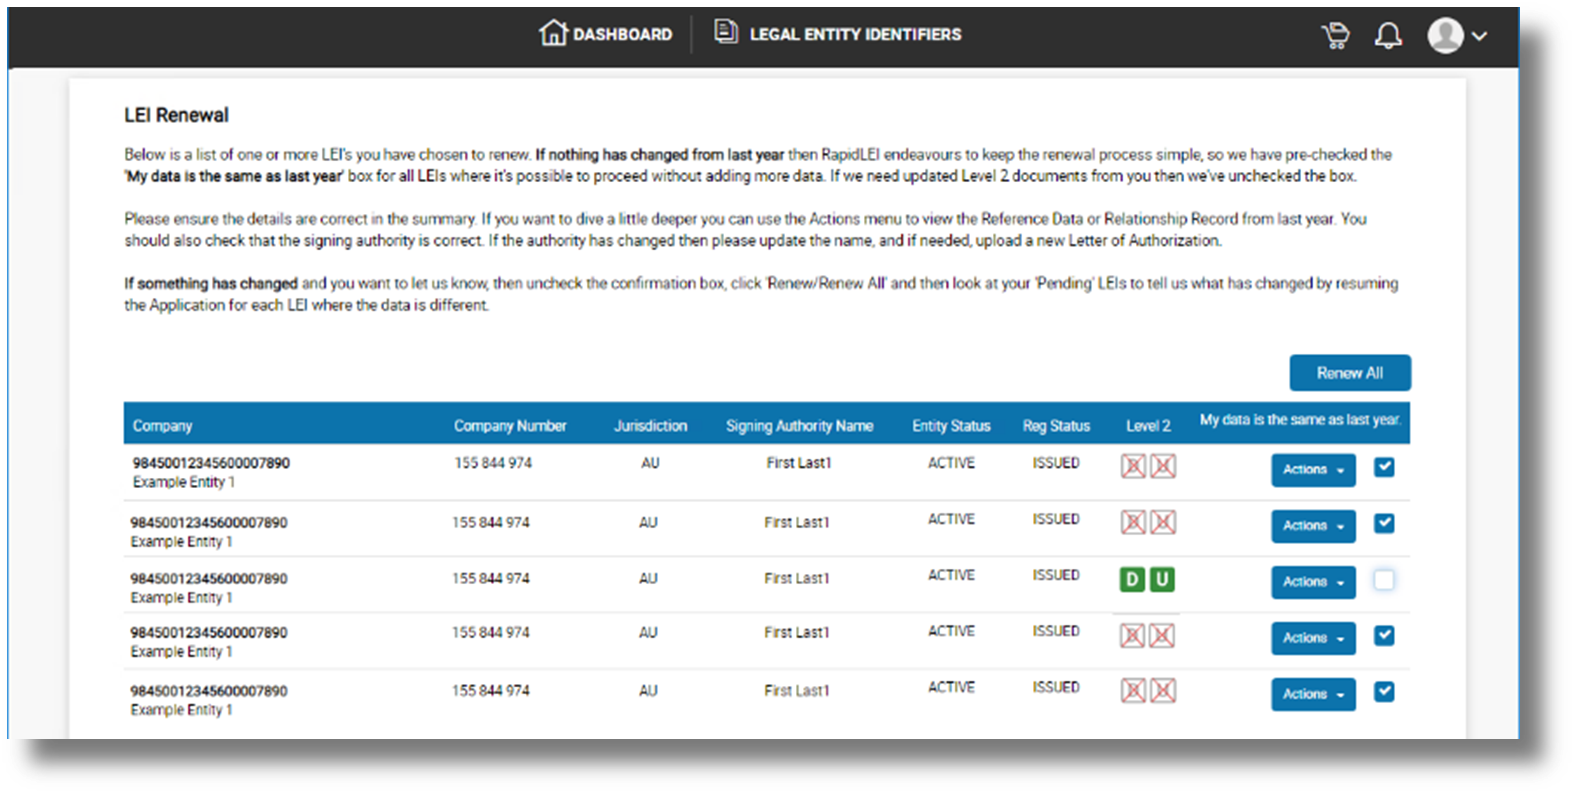
All we need is confirmation from you that nothing has changed, or if it has, details about the changes.
If you have changes to report, please deselect the ‘My data is the same as last year’ tickbox and the LEI will move to the PENDING menu.
The Challenge/Amendment Process (LE-RD)
It’s very important to ensure the Level 1 Legal Entity Reference Data is correct throughout the lifetime of the LEI. Please select the appropriate ‘Actions’ button dropdown and select ‘Amend Reference Data’ as shown below to submit the changes to the RapidLEI vetting team for renew/approval.

During the lifetime of the LEI the GLIEF may challenge the LE-RD (See diagram).
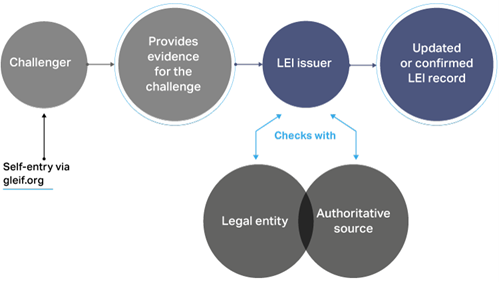
Their process is public and is highlighted on https://www.gleif.org/en/lei-data/challenge-lei-data. RapidLEI will verify via an authoritative source and correct any errors within the LE-RD. If the errors are technical, we’ll not reach out for consent. However, if the errors involve a modification to underlying LE-RD we’ll reach out by email and ask for consent before making the changes. Please note that if the company name or the company number changes, we’ll also reach out, but we’ll also highlight that we need a new contract signature. The previous version will have been invalidated by the change – We’ll ensure we make it clear and if we do modify the LE-RD we’ll highlight this in red to help you.
The Challenge/Amendment Process (LE-RR)
It’s also very important to ensure the Level 2 Relationship Records are correct throughout the lifetime of the LEI. Please select the appropriate ‘Actions’ button dropdown and select ‘Amend Relationship Record’ as shown below.

Challenges from the GLEIF may also affect LE-RR data. We’ll also reach out by email with instructions on how to validate the changes made to the records.
Retiring an LEI (closing a Legal Entity)
In the case of a closure of a company (i.e. moving the status of the LEI to RETIRED), you can request our vetting team to process the closure by clicking on the ‘Amend Reference Data’. We’ll open up a new browser window and you can check the LEI Number (1) and the Company Name (2) and select the change of status (3).

Please note that the lifecycle of a company may move from Active to In Liquidation, to Dissolved or back to Active and each possible lifecycle changes depends on the Jurisdiction of Incorporation and regulations/legislation. The United Kingdom is illustrated below. Our vetting and customer service team will help with this area should you have any questions or concerns.
Once the Amendment request has been made, the LEI moves to ‘In Progress’ for the team to verify changes. If the Legal Entity has been Dissolved, this will be confirmed by the vetting team, the legal Entity Status will be updated to INACTIVE and the date of the change recorded in the LEI CDF record with Registration Status ‘RETIRED’ and as well as being listed in the ‘All’ filter it will also appear in the “Retired” Filter.
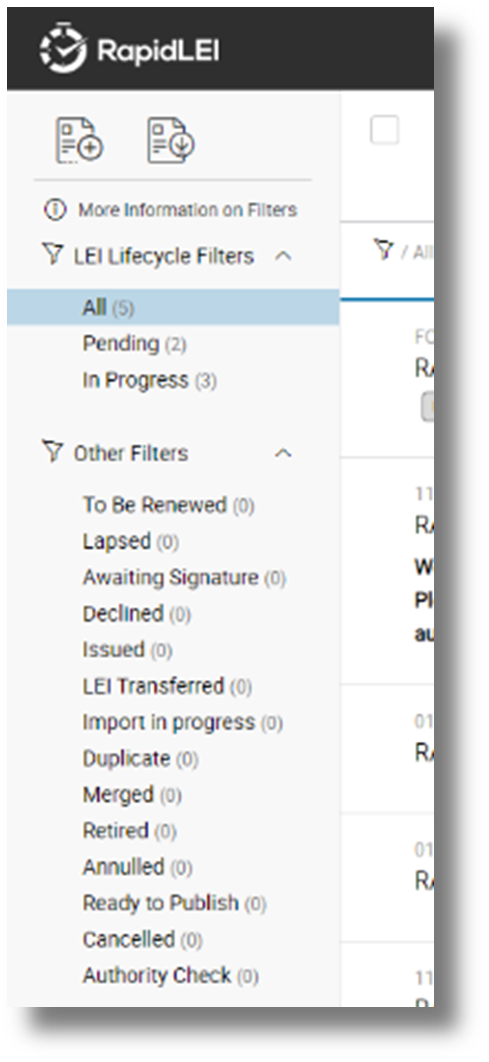
If the Legal Entity has MERGED with another entity, then please contact [email protected] to provide the details of the merger. The RapidLEI team will then modify the records appropriately and send a confirmation request by email.
If we detect a DUPLICATE LEI has been created, we’ll confirm which LEI should persist and either contact the LEI Issuer of the other record or modify the RapidLEI record appropriately to indicate the status and send a confirmation by email.
If there’s a problem with the LEI record such as the LEI number not complying with the ISO 17442 rules, the LEI may have to be ANNULLED.
The other statuses illustrate here are either transient in nature or detailed within the glossary section of this user guide.
Avoiding Duplicates – Best Practice
Prior to applying for an LEI Number it’s always advisable to see whether one has already been issued. The most up to date source of data is the GLEIF’s Golden Copy which is updated every 8 hours and Search 2.0 which is updated shortly afterwards, so please use the RapidLEI Search Tool at search.rapidlei.com
October 2020.


